Following the advice of the ever wise Emily McDowell I’ve recently been trying to hone down the essence of what I want this blog to be in order to give it more direction and to help me come up with better ideas. Part of this process she suggests using involves coming up with three words that define your brand, for me the words I wanted to define this blog, and all of my work, are: simple, honest and designed for good.

With these three words in mind the one idea that kept coming to me was making something to tell my demons to politely fuck off. I struggle with a lot of anxiety and bouts of depression, and it seemed only natural to me that the best way to be honest and to try and do some good was to choose to do the work over what was easy on the things that actually bother me in the hope it might help someone else. So, that’s what I’ve done.

The first demon I’m going to try and tackle is negative-self talk. It’s something I do a lot. It’s something everyone does at some point. It’s something that has affected my creativity, my productivity, and happiness.

Even though I know that it’s something that’s often irrational or just plain mean, I keep doing it. It’s not an easy habit to quit, and you can’t just replace the negative phrases with positive ones because that sometimes actually leaves you feeling worse.

So, what I’ve designed is a little decision diagram to help work through the negative-self talk, to break it down. I always enjoy doing these in magazines, and I thought it would be nice to replace negative self-talk with something I enjoy and that helps slow down my thinking and rationalise what I’m thinking. I’ve actually been using this, and it feels a bit silly at first, especially if I pull it out for the tiniest negative comment, but it has actually worked to stop myself falling into a negative spiral. That is in part just down to the fact that I’ve sat down and recognised that what I’m doing isn’t good for me, and actively doing something about it.

The next time you start talking to yourself negatively have a go at just working through this diagram and see how you feel after*.

If you want to print and keep the decision diagram, there’s a pdf here.

*I’m clearly not a psychologist or a therapist, so yeah, just bear that in mind – this is just me trying to tell my own demons to politely fuck off.

I think self-care is particularly important for people with creative jobs because so much of what we create has to come out of ourselves, and if you don’t look after yourself you won’t have anything else left to give. Plus, after my last post about some tough stuff I thought it was only right I shared some little things to make life better. Here are 48 little self-care activities (handily the number of weeks we have left this year) you can do to help you be your best self.

  1. Take 3 deep breaths – actively thinking about your breathing and slowing it down is a great way to destress and calm down.
  2. Have a shower – showers are just magic. They give you a moment to just stand and be quiet, plus when you slowly cool down after a shower your body relaxes.
  3. Make something with your hands – it doesn’t matter what, it could be a cake, a pot, a scarf, anything just make it with your mitts.
  4. Put some music on and have a dance – this never fails to make me feel better.
  5. Fix 1 thing that’s been irritating you – whether there’s a flickering lightbulb in your house or a loose button, fix one thing that bothers you. You’ll feel super productive and get rid of a pain point for future you.
  6. Meditate – meditation not only helps calm and centre you in the short term it can also help you get better at understanding yourself in the long term.
  7. Do a declutter – Marie Kondo has made a career out of how much decluttering can help you clear your mind. You don’t need to reorder your whole house, just tidy up a corner or a cupboard.
  8. Change your sheets – there’s nothing better than tucking yourself into clean sheets
  9. Unplug for an hour – we’re constantly online, checking our emails or our notifications. Try to set aside some time to go tech free, you won’t believe how liberating it is (after you get past the initial anxiety)
  10. Go for a walk – a little bit of light exercise will release endorphins and getting out in the fresh air can really help clear your mind.
  11. Call someone you love – sometimes it’s good just to have a chat about nothing, and I’m sure whoever you call will appreciate it.
  12. Treat yo’ self – buy a little gift for yourself because you can.
  13. Go out to the movies on your own – you can see whatever you want, sit wherever you want, eat whatever you want and completely escape into another world.
  14. Help someone else – this one’s just a double whammy of good, whether it’s big or small knowing you can help someone else will make you feel better about yourself and make someone else’s day.
  15. Stroke a pet – dogs go around hospitals for a reason, having a tickle of their fluffy little ears is guaranteed to make you feel better. If you don’t have your own volunteer at a shelter, borrow someone else’s, or make a friend at the park (but always make sure you ask permission first)
  16. Get dressed up – it’s easy to get into a funk of just wearing your pyjamas, but getting dressed up just for yourself can instantly perk you up.
  17. Write out your thoughts – this can help you clarify your thoughts and be really cathartic.
  18. Unsubscribe to all of those spam emails – search unsubscribe in your inbox and get rid of them all.
  19. Cuddle something/someone – it doesn’t matter if it’s a person, a pet or even a pillow, having a cuddle releases those feel good/cozy chemicals in your brain.
  20. Set up a compliments jar/folder – quite often we give more weight to the criticism we get rather than the compliments. Set up a compliments folder or jar so you remember the goof things people say about you.
  21. Moisturise – not only does this make your skin feel good, the process of rubbing a moisturiser into your body starts up your self-comfort systems.
  22. Have a mini-spa day – pamper yourself in any which way you choose.
  23. Unfollow everyone you don’t like on social media – you don’t need to follow someone who you don’t like.
  24. Write a list of your achievements – you’ve achieved a lot, don’t forget it.
  25. Make an album out of any loose photos – it’s always good to make something. Making photo albums is particularly fun though because it means you can go back through old memories and reminisce, plus you get to tick off the decluttering box as well.
  26. Do some colouring in – it’s fun and calming and taps into your inner child.
  27. Have a good cry – sometimes you need to just let it out, don’t feel bad about it.
  28. Change up your routine – go to work via a different route or change up your chore schedule. Changing your routine is a great way to change your thinking if you get stuck in a rut.
  29. Make plans – give yourself something to look forward to.
  30. Cancel plans – delete anything you don’t want to do from your diary.
  31. Try out aromatherapy – I was cynical about this before but it really does work!
  32. Stretch – a simple quick fix that can give you a 30 second refresh, and helps combat those desk based injuries.
  33. Write a thank you letter to someone you love – remind yourself of the people you’re grateful for and then make their day by telling them about it.
  34. Volunteer for a charity you believe in – do good, feel good. It’s that simple.
  35. Go to a coffee shop and order something delicious – take yourself out on a mini date. Eating something tasty always makes you feel good and it’s never a bad thing to get out and go somewhere new.
  36. Make a pillow fort – it’s fun and snuggly, like a less pretentious hygge.
  37. Have a nap – sometimes you just need a rest, and I have a strong belief that naps, like tea, solve everything.
  38. Sign up to a class – learn something new and meet some new people.
  39. Eat some fruit – eating something that’s good for your body will make you feel better not just physically but mentally.
  40. Travel somewhere new – travelling is good for the soul, and experiencing something new can give you a different perspective on your life.
  41. Take yourself outside – your mum was right you really do need some fresh air, and it’s best sampled amongst the trees or on the beach.
  42. Bring nature inside – there’s loads of science that says that houseplants are good for your mental and physical health, and who am I to disagree with science?
  43. Watch something guaranteed to make you laugh – sometimes you just need to laugh to remind yourself you can.
  44. Repeat an affirmation until you believe it – this one is quite old school but sometimes you need to give yourself a bit of a pep talk.
  45. Cook a whole meal and sit down and eat it at a table – you’ll feel accomplished and nourished, what could be better?
  46. Make sure you cook and freeze some leftovers too – this one is self-care for future you.
  47. Chat to a stranger – start up a conversation with someone in a shop rather than using the self-checkout
  48. Listen to an uplifting podcast – fill your ears with something that makes you feel better.


January is normally when we try to be our best selves. We set goals. We embark on behaviour changes. We have high expectations. But it doesn’t always go to plan.

For example, this post was going to be about my creative process. But the more I thought about it there was a big gap in that process that I was going to have to try and cover up, if I wanted to describe the process I want to have. So instead this post is going to be about perfectionism and performance anxiety.

I focus on creativity and productivity on this blog, and I try to keep it positive. I’m all about trying to get better. Trying is key there. I don’t think this blog would be honest if I said it was all easy, and I always live the advice I give 100% of the time because I don’t. I’m trying my very best but sometimes I get stuck in rut or lose motivation or get so scared I can’t do anything.

One example of that is my sketch book, or, rather, my lack of sketch book. I haven’t had a real sketch book for about 5 years now, which I know sounds crazy. I try and normally get a few pages through and then I give up because I can’t bring myself to use it. I’m what Tiffany Han described as a reformed (reforming) good student on a recent podcast. At school we were marked on our sketchbooks as well as our final pieces, which meant that every page had to be planned and presentable. Now, as a ‘grown-up’ I’m still in the same mindset. I have a lot of anxiety about making each page good, even though no one needs to see them. I plan on loose pages or I don’t plan at all. I don’t really play with my materials anymore, and that was why I loved art as a kid, just making and getting messy. But I keep letting the fear hold me back. I know it’s irrational. I know I’m missing out on a lot too.

I also know I’m not the only person who’s dealing with it. Even if it’s not to do with sketchbooks, I think everyone who makes, everyone who pursues a creative career has dealt with the fear, I think.

That same fear has held me back from starting a lot of projects. I’m still trying to get going on a project I’ve had in mind for a couple of months now. I know I should just get started, but I’m currently just letting my own good taste get in the way as Ira Glass would say. I’m not sure anything I’ve ever created has been an exact print out of what I had in my brain, yet that’s always what I strive for and fear not achieving. I would love a command+p for your mind, but alas it doesn’t exist and sometimes you get something a bit magic when you try and translate your thoughts with your hands.

I feel the most anxiety with my own work. I guess because I’m the only one responsible for it. Plus, I think everyone is naturally a bit more invested in their own stuff because it represents them. Putting something with your name and identity out into the world is terrifying.

But, when I’m working on something for a client I’m happy to present rough ideas and develop them, because it’s a collaborative process. I actually enjoy the rough ideas stage.

I need to start treating myself like my own client. My own work is a process too and I need to be able to have more fun with it. I’ve just started a rough book, it’s a sketchbook but without the baggage of the label sketchbook and it’s just going to be a place for play.

This is the creative process I’m currently going through. I’m rebuilding and restructuring and relearning. If you’re dealing with the fear, I promise it’s a demon you can fight, and defeat, because I’m doing it now, little by little.

If you’ve had the misfortune of having a long conversation with me in the last year, you will almost undoubtedly have heard me talk about the new pound coin, which is why I can’t believe I haven’t written a post about it until now. It’s a small design change that is going to affect the day-to-day lives of everyone in Britain, how can we not be talking about it? I wanted to spread the word because I was kind of shocked at how many people didn’t know when the new fiver was being released last year, and the number of funny, but worrying, counterfeiting pranks that opened the flood gates to. I’m thinking of scenarios like the on played out on Hamish and Andy’s radio show when they were able to spend $20 notes because no one was aware of the change over in currency.

The new pound coin is released on 28th March 2017 and will have completely phased out the old round pound by October of this year. The first thing to say about the new pound, if you didn’t know already, is that it has 12 sides. This “new” shape is said to be reminiscent of the old threepenny bit, for those who can remember that far back. It’s also thinner, lighter, and a little bigger than the current pound. Most importantly, it’s a whole lot more secure. Approximately 1 in 30 of the pound coins in circulation currently is a counterfeit – if you want to learn how to spot a counterfeit in the last few months of the old pound coin, the Royal Mint has lots of information about it. The new coin features a latent image panel, micro lettering around the rim, a bimetallic composition (like the £2 coin), milled edges as well as other security features.

Jody Clark, the Royal Mint designer, produced what is now the fifth coinage portrait of the Queen that features on the front of the coin. The tails side of the coin features the four heraldic beasts – the rose, the leek, the thistle and the clover – to represent each of the four nations of the UK and was designed by 15-year-old David Pearce, who won a public design competition. Despite its brand-new shape, its design makes it feel like a truly classic coin. The new shape and milled edges also make it easier to identify by the visually impaired (and those too lazy to look in their wallets) meaning it’s also a more user friendly coin.

Despite only being just over 30 years old the pound coin has become something of a national talisman, held up as a symbol of Great Britain in a variety of debates. Every pound coin has featured a portrait of Queen Elizabeth, so it has also become a symbol of her reign to a certain extent too. I think one of my favourite features of the round pound is the phrase just over half of the 44 different designs are inscribed with: DECUS ET TUTAMEN, which means ‘an ornament and a safeguard’. The phrase was originally written across silver coins to deter clipping, literally serving as an ornament as a safeguard. It performs a similar role on today’s pound coins, with one of the key signs of a counterfeit coin is the poor inscription of the Latin around the edge. I’m going to be quite sad not to see it written on the new pound coins, but I guess it’s just a marker of the advances of counter-counterfeiting technology.

The new design of the pound coin led to a lot of other updates outside of its own faces. Until you think about it, it’s easy to forget how many things a pound coin goes into, self-checkout machines, supermarket trolleys to name but two. Most of these systems should be updated by March. The importance of this was one of the big points of the speech I gave to unsuspecting friends and family. The important bank and payment systems are being updated mainly through software upgrades, and many, if not all, trolleys are being refitted, so there should be nothing to worry about. But, if you run a business that uses pound coins, and you haven’t done so already, have a read of this.

So, what do you need to do? First, get excited about the new pound coin. Second, check down the sides of the sofa and dig out all of your old pound coins in the next 6 months or so and make sure you spend them – the period for cocirculation ends in October meaning any pound coins you want to spend should be spent before then. Third, read up about the Royal Mint and numismatics (the study of coins) – it is honestly fascinating!

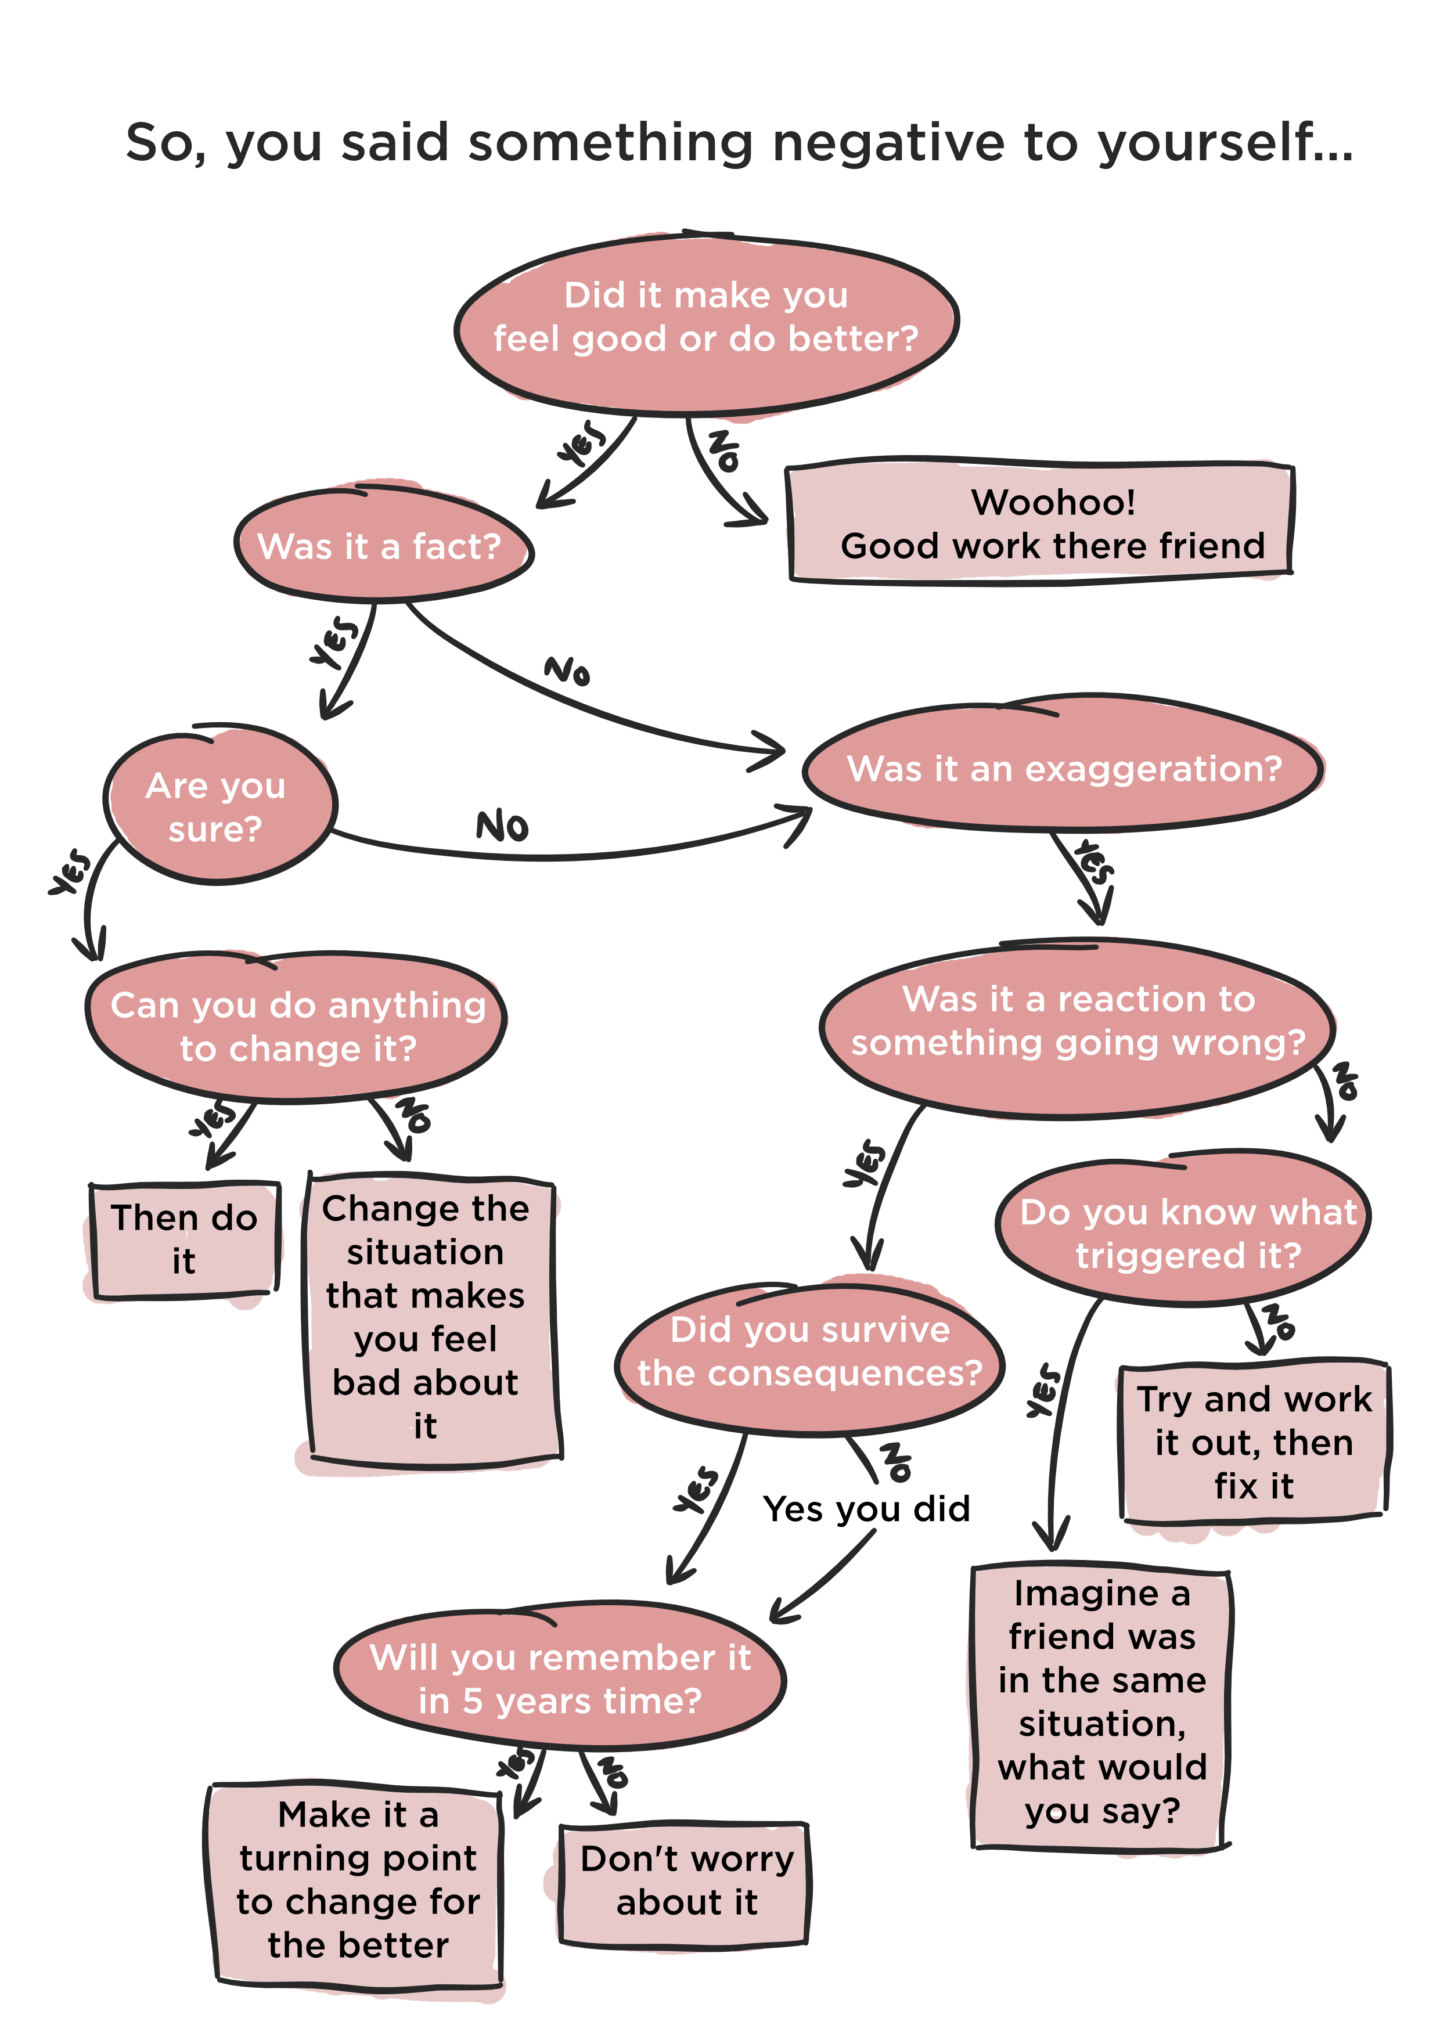
I wanted to put together a series of helpful practical design tips for non-designers, because, as 99 per cent invisible has taught us, everything around us is designed. Today, I’m starting off with tips for designing effective and aesthetically pleasing presentations. I’m going with powerpoints/keynotes/slides/decks/cards first because they’re the thing I see designed at work most frequently, and, quite often, most awfully. Here are some simple tips to improve your presentations and really impress your office.

1. PLAN IT

This might be obvious, but don’t just jump into making your presentation. Sit down decide what you want to make, the story you want to tell and the aesthetic you want to have. If you need some inspiration, slideshare has some really amazing presentations. 

2. COLOUR SCHEME

After you’ve decided on your content, one of the first things you need to think about is a colour scheme. You don’t want to use more than 5 colours in a presentation, I usually just go with 3. Most companies have a set colour scheme so you might just have to use that, and if you’re working on a client presentation I’d suggest integrating some of their company colours. If you’re working on something with no rules, and don’t know where to start, check out Coloors.

3. USE SANS SERIF FONTS

The next basic decision to make is what font(s) you are going to use. Sans serif fonts are easier to read on screens, so stick within the sans family. I’d recommend using a maximum of two fonts, one for headers and one for body text, or just one for everything. If you’re bored of the ones preloaded onto your computer check out Dafont.com’s list of free fonts, or go with an opensource font like Lato.

4. USE MASTER SLIDES

I feel like people are afraid of using master slides but they are such a great resource. The very minimum you need to do is set up your logo and a simple header on every page so it’s always in the same place and the same size. But you can go as far as setting up all of your set slide layouts to create consistency, which I would highly recommend and will save you a lot of time in the long run, especially if you’re making a lot of presentations.

5. ONE IDEA PER SLIDE

You only want to have one idea per slide for maximum engagement and impact.

6. USE SIMPLE LAY OUTS

You don’t need to reinvent the wheel stick to basic layouts half text and half image, single image, single headline stat etc. You don’t want your audience having to spend all of their time working out where to start reading/looking, just stick with what they know.

7. DON’T CLUTTER

The second part of having simple layouts is having simple content. The fewer things you can have on a slide the better. Keep it to 1 idea per slide. Don’t overwhelm your audience with lots of colours, text styles, or different images, the more stripped back your slides are the easier they will be to digest.

8. USE LESS TEXT AND DON’T WRITE IN SENTENCES

Follow the six-by-six rule, have no more than six lines of text of six words. If that’s too tough, I would recommend sticking to just the six lines and not writing in sentences. People are only scanning the text you put up on screen so it doesn’t need to be fully formed text. In no circumstance, ever, should all of your script end up on the slides on the screen, if you do that you may as well send out your presentation as an email. Your slides should just be a visual aid to whatever it is you’re saying.

9.CONSIDER SIZING

Quite simply make the important information bigger. That doesn’t mean make every word a different size, but have one larger size for headers and smaller one for body text (always keep it over 24pt for readability though).

10. ILLUSTRATIONS OR PHOTOGRAPHS

Decide if you want to use illustrations or photographs. While there is no hard and fast rule that you can’t use both, almost all of the best presentations I’ve seen go with one or the other. Whichever you go with, make sure you keep the visuals consistent by using similar styles of illustration or photography. If you’re using photography just use a single image per slide where possible. For slides where you want to use a single image as a background, but it’s a bit too busy, you can use Fotor’s blur function for free to blur sections of your image so you can place text over them and still read it. Also, if you’re looking for icons please please please check out the noun project

11.GO VISUAL

To go along with using less text, try and make as much of the information you have visual as possible. Humans process images much faster than they process text, so making your information as visual as possible means it’s more likely to be digested much more easily. Some things you could do include illustrating percentages, using icons, or simple flow diagrams to show how information is linked.

12. BUT KEEP YOUR GRAPHS SIMPLE

No one has the ability or the time to pour over a really detailed, multi-layered graph during a presentation, especially if you’re speaking at the same time. Simplify your graphs as much as possible, or break them down, so that they’re easy to see and follow. You can always hand it out as an appendix if you needed.

13. CONTRAST

Make sure there is enough contrast between your text and your background, otherwise no one is going to be able to read what you’ve written. Don’t put two clashing colours together though, if you want to use a bright colour somewhere pair it with a neutral, black or white.

14. ALIGN

Where you’ve used icons or blocks of text make sure you align them so everything is neat and follows clean lines. This seems like quite a small, pointless, bit of extra work but it makes so much difference, and can make your presentation look so much more professional.

15. NO TRANSITIONS

Just don’t use transitions, you’re not 7. It’s that simple.